This could be a 14 part post with all the awesomeness that happened in the garden and kitchen this summer, but I will settle for a quick hi and tell you about two of my most favorite discoveries. These are so awesome that I have nothing to add to make it easier or better, just a wholehearted recommendation to try these two things:
1-homemade bread. The whole yeast, proofing, rising, kneading thing always seemed a bit daunting and pretty labor intensive. This was until I learned that one can make home made bread in 5 minutes a day. I checked out the book from the library because I had a hard time believing it was really that easy. I'm here to tell you, it really is minutes to make the dough ahead of time and minutes to prep on baking day. Sure, it takes longer than 5 minutes to bake, but hands on time really is maybe 5 minutes!
2-lacto-fermented salsa. Until this summer I had no idea that one could use whey (the liquid stuff that forms when yogurt separates) to ferment and preserve salsa. I found the recipe from one of my favorite garden bloggers. You can read it here and give it a try too. I only made 1/4 of the recipe and it took about 2 hours total, from harvesting the tomatoes to putting the lids on the jars to get almost 3 quarts of salsa. It is a task, but a great way to keep some of our valuable garden harvest around a bit longer.
Happy end of summer!
Sunday, September 8, 2013
Wednesday, June 5, 2013
A Garden Variety Dinner
The dictionary defines garden variety as something ordinary or commonplace. My first thought is there is nothing ordinary or commonplace about food coming to the table from our modest little urban homestead. In fact it feels down right magical. I imagine the origin related to flowers but I'm going to roll with my interpretation.
The garden is thriving and I've been so busy with it and the house and smalls that I haven't had time to write about it.
Yesterday I came home to a find my husband had happily harvested our first potatoes:

Today I spent some time outside and came back with this:
 What you see is kale, sugar snap peas, green beans, a tiny super-sweet 100 tomato, a red brandy wine tomato, carrots, and a couple of small beets.
This was our dinner:

-Beans and peas steamed until just tender-delicious with no seasoning
-Potatoes sliced and pan "fried" in the tiniest bit of butter seasoned with salt and pepper
-Carrots raw and crunchy
-Tomatoes (A gentle reminder that there are only two things in this world you can't buy. True love and home grown tomatoes.)
-Kale salad with a lemon shallot vinaigrette and goat cheese
I enjoy cooking and I tend to plan and prepare more cohesive meals, but I do not think I have ever been more pleased with something I put on the table.
This whole experiment started because I ran out of croutons one night. I really am an accidental urban homesteader. I was not prepared for how much joy and satisfaction would come from feeding my family from our little garden. I can't turn back now. I'm hooked.
The garden is thriving and I've been so busy with it and the house and smalls that I haven't had time to write about it.
Yesterday I came home to a find my husband had happily harvested our first potatoes:

Today I spent some time outside and came back with this:

This was our dinner:

-Beans and peas steamed until just tender-delicious with no seasoning
-Potatoes sliced and pan "fried" in the tiniest bit of butter seasoned with salt and pepper
-Carrots raw and crunchy
-Tomatoes (A gentle reminder that there are only two things in this world you can't buy. True love and home grown tomatoes.)
-Kale salad with a lemon shallot vinaigrette and goat cheese
I enjoy cooking and I tend to plan and prepare more cohesive meals, but I do not think I have ever been more pleased with something I put on the table.
This whole experiment started because I ran out of croutons one night. I really am an accidental urban homesteader. I was not prepared for how much joy and satisfaction would come from feeding my family from our little garden. I can't turn back now. I'm hooked.
Saturday, May 11, 2013
Happy Accidents
I've talked before about using the principles of square foot gardening to maximize the growing potential of small areas. The quintessential bed is 4 feet by 4 feet. This size is manageable and can be tended from any side without having to step into the planting area. 4 x 8 was a better fit for our yard, but still allows me reach across from either side of the bed, assuming of course that 4x8 isn't planted up against a wall. It is really hard to reach across this 4 foot bed without trampling on something.

This was the same bed I had a bit of issues with wind and kids and clumsiness. For some reason, a bunch of the stuff did not sprout. I'm not sure if it was bad seed or birds or just the nature of gardening but it meant there were some open areas in the bed. This gave me chance to add stepping stones to help for harvesting and garden maintenance. In the remaining space I replanted what did not make an appearance before. For now though, the beets are growing and I have ample arugula and leaf lettuce.


This was the same bed I had a bit of issues with wind and kids and clumsiness. For some reason, a bunch of the stuff did not sprout. I'm not sure if it was bad seed or birds or just the nature of gardening but it meant there were some open areas in the bed. This gave me chance to add stepping stones to help for harvesting and garden maintenance. In the remaining space I replanted what did not make an appearance before. For now though, the beets are growing and I have ample arugula and leaf lettuce.

Friday, May 10, 2013
Why jump starting your seedlings isn't always a good idea
We fell for it. The nervous excitement of the coming spring. The pretty seed catalogs. The promise of the earliest ripe tomatoes in town. We started our seeds way to early and for us it was not the right move. The ready availability of heat mats and grow lights made it all possible. Here are the problems with this idea
-Seedlings get big fast. It's all fine and dandy when they are little, but when you end up with 75 plants that are 10-14 weeks old, it's too much. We ran out of room under our light, they were too crowded together which is not ideal.
-Unless you intend to build a cloche over the plants when you plant them outside, it won't be warm enough to really help most of them grow and thrive. We planted ours in early April and while it was not cold enough to harm them, the plants did not thrive. If we had a short growing season, I can understand it would be worth the effort, but we are pretty fortunate to have an ample growing season.
-When you start them early you have to keep re potting them into larger containers. This requires more material, time, and space.
-Bigger plants are harder to simply discard. There is a process of picking the best seedlings and thinning them out that happens over time. It's easy to toss a skinny two inch sprout. It's not so hard to toss a plant that is a few inches tall and has 6 or 7 leaves. When that plants is a foot and half tall with flowers on it is REALLY hard to compost it because there is no more room. This is how one ends up with 26 tomato plants planted. This does not include the 10 or so we gave to friends. 26 tomato plants. Ri-damn-diculous. I see a post in my future called "tomatoes, what the h e double hockey sticks were we thinking?"
In the meantime, I guess I better get comfortable canning tomatoes.
-Seedlings get big fast. It's all fine and dandy when they are little, but when you end up with 75 plants that are 10-14 weeks old, it's too much. We ran out of room under our light, they were too crowded together which is not ideal.
 |
| These were scattered all over our family room |
-When you start them early you have to keep re potting them into larger containers. This requires more material, time, and space.
-Bigger plants are harder to simply discard. There is a process of picking the best seedlings and thinning them out that happens over time. It's easy to toss a skinny two inch sprout. It's not so hard to toss a plant that is a few inches tall and has 6 or 7 leaves. When that plants is a foot and half tall with flowers on it is REALLY hard to compost it because there is no more room. This is how one ends up with 26 tomato plants planted. This does not include the 10 or so we gave to friends. 26 tomato plants. Ri-damn-diculous. I see a post in my future called "tomatoes, what the h e double hockey sticks were we thinking?"
In the meantime, I guess I better get comfortable canning tomatoes.
Thursday, May 9, 2013
Peas and Thank You
One of our beds is home to green beans and sugar snap peas. The beans are a bush and don't need support, but the peas require something to climb. There are endless options of things to build or buy.
I chose a simple frame made from left over wood from another project. On that frame I strung jute twine and then looped a piece of twine around each plant.


I chose a simple frame made from left over wood from another project. On that frame I strung jute twine and then looped a piece of twine around each plant.


At first I was cutting the twine after each plant, but by the end I realized I could just run the twine along the ground between each plant. The next morning I went to check on them and it turns out peas were born to climb. Give them something to climb and the small tendrils will wrap tight and the plant moves upward.

I did find this process somewhat tedious, but it was inexpensive and when our growing season is over all I have to do is cut down the twine and toss everything into the compost. With a trellis I would have had to untangle the plants from the structure. I know this about myself, I am better at front end preparation so this seemed like the way for me to go.
Provide support for your climbing plants. Your peas for one will thank you.
Thursday, May 2, 2013
Meanwhile back at the ranch err homestead err front yard
So it turns out planting a garden, maintaining the home, and caring for the smalls does not leave nearly enough time for writing about the experience. The great news is we have an honest to goodness vegetable garden growing. We've even harvested radishes already. While I don't love radishes all that much, it's a great motivator to pull something edible up when it's not clear how this will all turn out.
In addition to our radishes, we have some meaningful experience under our belt and some important lessons for our future endeavors. Among those lessons: starting things indoors too early is a big ole waste of time and slugs really do suck. More soon!
Happy Homesteading!
In addition to our radishes, we have some meaningful experience under our belt and some important lessons for our future endeavors. Among those lessons: starting things indoors too early is a big ole waste of time and slugs really do suck. More soon!
Happy Homesteading!
Monday, March 25, 2013
The best laid plans
I have a 4x8 bed just outside my kitchen that I've been meaning to get planted for weeks. Today was the day I went for it. I planned the area out using square foot planting guidelines and went to work.
It was moving along swimmingly until I had help from the wind, a certain small that shall remain unnamed, and my own clumsiness. I planned for an organized area with clear boundaries as to what I planted where. That's not what I ended up with. I know what I planted in the area, but it's going to have a more eclectic look than I had intended.
Notes to self for next time:
-wind and small seeds do not mix
-don't hold palm fulls of seeds while balancing precariously over the planting area
-don't leave seed packets and smalls unattended
-pay attention to the garden plan and try not to plant lettuce over the already planted arugula.
What planting mishaps have you encountered in your gardening adventures?
Sunday, March 24, 2013
Self sufficiency through self service snacks
I can portion out my big bags of stuff into smaller ziploc bags, but I do want to minimize trash.
I can use little glass containers, but those are not what I call kid friendly and pretty heavy to tote.
I could use stainless steel, but it's not transparent.
I want my smalls to enjoy their food but I want it to be somewhat nutritious and varied.
I want to spend less time standing at the kitchen counter playing the role of short order cook.
I want the kids to eat a specified meal and snack times, but I want to respect that their hunger may not follow my rules.
I want to end the conflict that ensues from the very reasonable limits I set around the consumption of things like dried apricots.
I want to foster independence in my kids but I am not enough of a free range parent to let them run amuck in the kitchen. While my 4 year old is more than happy to scale counter tops to find knives and cut up his own stuff, I can't be convinced it will end well.
I'll own it, this dilemma of mine is undoubtedly a first world problem, but it's important to me and related to simplifying my life. In this endeavor I invoked a self service snack box policy. I will continue to make breakfast to order and a dinner that should appeal to everyone at some level. For everything in between, here is my plan:
-Each day I will fill boxes in the fridge with a variety of foods the kids like.
-When they are hungry, they can help themselves to whatever is in the snack box.
-If they want PB&J at 10am and a hard boiled egg for lunch, so be it.
-If they are unsatisfied with their options, they can have a banana.
-If they don't love dinner, they can finish their snack boxes.
I put these together today and the kids were happy to help themselves.


I landed on small plastic containers as the most reasonable option. The kids can see their choices, they won't break, and it's for storage, not heating. While it might be a stretch to relate this to urban homesteading, this is absolutely a lesson in making it simpler on me and encouraging the kids to practice becoming self sufficient. Plus, with less time in the kitchen, I'll have more time for the garden!
Monday, March 18, 2013
Planting the garden, square foot style
We've begun planting two of our beds using the spacing guides suggested by square foot gardening. The general idea is that you plant seeds in groups of 1, 4, 8, 9, or 16 per each square foot. I made a simple template using a piece of scrapbook paper and a pencil to punch holes showing me where to plant.

For each square, I punched out the appropriate planting pattern and then planted and covered the seeds. I used additional sheets of paper to help maintain spacing over the 4x8 bed.


Our beds are each 4 foot by 8 foot creating 32 square feet to work with. In this bed we planted 3 squares each of red onions, white onions, garlic, turnips, radish, and kohlrabi and 6 squares of carrots. When it warms up a bit more we will plant lemon cucumbers in the remaining 8 squares.
The second bed is for beans and peas and is being planted in a similar fashion. The difference here is we are planting sections a few weeks apart in hopes of having a longer season to harvest.
Thursday, March 7, 2013
Kinder Garden
A few weeks ago we had a long overdue visit from my mother in law. She suggested that we give each of the smalls an area in the garden to plant and tend. She had very fond memories of a small garden she and her brother had when they were young and imagined our kids would enjoy the experience as well. So was born the idea for the kinder garden.
I had other plans for this area originally, but it was just the right size and location for this project. There were already and handful of strawberries that predated our ownership and it is right near their play area. Earlier this week we weeded and prepped the area. Robbie was very focused on removing rocks and rather proud of the bucket he collected.


I took Robbie and we got some additional strawberries and I let him pick out a bunch of flowers. We did also plant some beans, but I wanted them to get the immediate satisfaction of seeing the garden full of plants. It takes patience to wait for seeds to sprout, and smalls in general are short on patience, at least mine are.
When it came time to plant, I dug the holes, but left the plant location selection up to the smalls. They did a phenomenal job and had a great time doing it.
 |
| If you look closely you can see my DIY shed in the background. |
 | ||||||||||||||||||||||||||||||||||||||||||||||||||||||||||||||||||||||||||||||||||||||||||||||||||||||||||||
| This was serious business |


The area would not have been been complete without a sign, so I used some old wooden stakes and leftover paint to declare this area our very own kinder garden.


Tuesday, March 5, 2013
I used to like birds
I used to like birds and feel indifferent about slugs and the like. I have a feeling all that will change in the coming weeks and months. We had some visitors to our front garden beds:

And some slimier creatures near our back garden bed.


And some slimier creatures near our back garden bed.

As you might imagine my browser history is filled with "how to detract birds" and "how to kill slugs without poisoning humans, pets, and wildlife."
I don't know how all this will play out, but I can say this. Bring it my feathered friends and slimy suckers. Bring it.
What is your favorite way to discourage unwanted visitors to your vegetable garden?
Monday, March 4, 2013
My DIY garden shed
Our garden tools meander about the house, garage, and backyard. It drives me batty. I like everything to have a home. I am not phenomenal at making sure things always go right back to said home, but when I do go to put something away, I want to know right away where it belongs.
The solution was easy, get a garden shed. I was researching options about buying or building one, when we received a large shipping container. I eyed it and thought with a little effort, it would do a fine job of containing our garden tools. Today I used a bypass saw and few screws to create this gem. It's not pretty. It won't get 1000 repins on Pinterest. It may not last that many seasons, but it will do the job. Best of all, it was free and it is getting more use out of something before sending it off to recycling or the landfill.
Here is it, in all it's ugly glory:


All I did was take the front piece of thin plywood and cut it into three sections. One section was for the roof, one for the floor, and one as a half door of sorts to keep things in.
There are definitely times when buying something makes the most sense, but it's a unique challenge to see what I can do with what I have on hand.
Sunday, March 3, 2013
Things I'll likely never buy again
I say likely, because I am wise enough to know that absolutes are generally just disappointments waiting to happen.
For me, this whole homesteading idea and gardening thing is about slowing down just a bit, figuring out what we can do on our own, and what maybe we can do without. Here are three things I will be hard pressed to buy again:
Jam- I blogged about my learning to make jam last summer and I am hooked. For the last 7 months my family has happily had their jam needs met with delicious fruity goodness that was made with love and as little sugar as possible. We had strawberry, peach, and blueberry. I'm looking forward to working with new fruits as the season progresses.
Croutons- Dried crusty bread was an eye opening experience for me. I blogged about it here, but the gist was simple-I wondered how I could readily become more self sufficient, how many of those things I rely on the supermarket to provide I could just make on my own. Croutons is one of those I can easily do on my own with great results.
Yogurt- Inspired by the frugal girl, I gave yogurt making a whirl and was pleased by the results. I used 1% milk as that is just what works for our family. I let it set a bit more than 3 hours to get the set firmer. I've also strained it to make Greek yogurt and then used the whey for smoothies for the smalls. This is a bit time consuming, but so very cost effective.
Next on my radar is making soft cheeses like ricotta and mozzarella, so stay tuned.
What have you come to enjoy making on your own? What do you hope to add to your skill set in the future?
Friday, March 1, 2013
The learning curve
The seeds for this idea planted themselves almost a year ago, and as we approach spring and the major planting season, we are well on our way. Here are some highlights of what I've learned so far.
Don't over think it-It's important to be educated, but as with most things, the right and wrong way to do something is largely a matter of opinion and varies drastically depending on your growing region.
Double planting isn't for me-I'd seed the idea of planting carrots and lettuce in the same section of garden. The idea is you can harvest the lettuce and then let the carrots finish growing. The issue here is I planted a leaf lettuce that could be cut and harvested repeatedly so the carrots never got their time to shine and grow.
Sewing seeds carefully is worth the time-For our first bed I way over sewed the seeds with every intention of thinning it appropriately. It turns out a suck at thinning the plants and would be better served to plant them more carefully.
Write things down-Our front room is covered in seedlings, we have things going into the ground already, we have big plans for the rest of it and it would be easy to lose track of things.
Connect with local resources-I first met folks from the Marin Master Gardeners at our local farmer's market. They have a wealth of knowledge and a genuine desire to share that knowledge. I've also found that the folks at our local nurseries and garden stores are deeply passionate about what they do and have tons of experience to draw on.
Be steadfast-Tending a garden is a slow process and takes awhile to reap the rewards.
Thursday, February 28, 2013
Meanwhile out in the garden
I wrote previously about our first attempt at a winter garden. Our brassica bed with kale, romanesco, and broccoli was what one might call less than stellar. Typically one hopes for heads of broccoli and romanesco. We harvested florets. The kale was fine, but we didn't get a huge amount. In all fairness though, we put it in really late and barely paid it any mind.
Our other bed was a mix of carrots, lettuces, arugula, parsley, cilantro, green onions, spinach, and Swiss chard. We had a decent harvest, with ample lettuces, arugula, and cilantro. In preparation for our spring planting, we made our last harvest so we can get the bed ready for tomatoes and peppers. We had very little in the way of carrots and pretty low expectations at this point, so I was pleasantly surprised to harvest this:


Most of them were small, but we ended up with about a pound of fresh crisp, sweet yumminess. And to think I thought the carrots were a total bust.
In addition we had a large bowl packed with lettuce and a huge amount of cilantro. The lettuce we used right away and I saw a TV chef freeze fresh parsley so I'll give our cilantro the cold shoulder and see how that works out!


Friday, February 1, 2013
Our Garden Plan
I started plotting out the garden beds with pen and paper, then tried a spreadsheet and while each worked just fine, I was thrilled to come upon this garden planning software. It is super easy to learn, filled with helpful information, and customizable to your particular climate. It even has good information about companion planting and crop rotation. I measured out our front and back yards, plugged the data into the software and went to town. Looking at our yard in this way actually helped us to identify more areas we could use for our edible garden.
This is the plan for our front yard:

This is the back yard:

The program also provides really helpful information about when to start indoors/outdoors and has room for personal notes.

This is the plan for our front yard:

This is the back yard:

The program also provides really helpful information about when to start indoors/outdoors and has room for personal notes.

I know the text of these images is likely to small to read, but hopefully you get the idea. We are growing the basics, tomatoes, peppers, squash, beans, and trying a few more uncommon items like rutabaga and kohlrabi.
We measure our growing area in feet rather than acres, and have been inspired by the idea of square foot gardening. I don't think we fall under the umbrella of a true square foot gardener, but we are growing most of our plants more tightly spaced than traditional recommendations. We will know is several months how this pans out!
Monday, January 28, 2013
A day in the life of a seed
I've started plants from seeds a handful of times, but watching them come to life makes me giddy. There is nothing, then poof, there is life! I wrote about starting our second batch seeds just last week. We started them on Wednesday evening. When I went to bed on Saturday night there were containers of dirt and a dream.
On Sunday at 7 am we had this:

At Noon, we had this:

At 10pm, we had this:

And this morning I awoke to this (well and a hungry kid):

It's a great way to start the week! Grow seeds grow.
Sunday, January 27, 2013
Our Seed Selections
Just before Christmas I stumbled upon a great blog Northwest Edible Life. It is full of useful information for urban gardeners and it is written with just the right sense of humor for my taste. We were deep in the seed selection process and actually experience stress over it when I read this post. It takes a very even handed and thoughtful approach to seed selection.
The bulk of our seeds came from Botanical Interests for no other reason that their selection was ample without being overwhelming and their seeds packets are beautiful and contain a lot of very useful information about growing each plant. We also purchased several seed packets from Totally Tomatoes. They offered a better selection of hybrids that we wanted as well as several larger variety tomatoes. We also have several seeds left from Cornucopia Seeds that I bought at our local Ace Hardware when we were rushing the calendar to get a garden in last fall. In all, this is what our seed selection looks like.
The bulk of our seeds came from Botanical Interests for no other reason that their selection was ample without being overwhelming and their seeds packets are beautiful and contain a lot of very useful information about growing each plant. We also purchased several seed packets from Totally Tomatoes. They offered a better selection of hybrids that we wanted as well as several larger variety tomatoes. We also have several seeds left from Cornucopia Seeds that I bought at our local Ace Hardware when we were rushing the calendar to get a garden in last fall. In all, this is what our seed selection looks like.
| Seed | Year | Source | Notes |
| Arugula Rocket Salad | 2013 | Botanical Interests | |
| Basil-Large Leaf Italian | 2012 | Botanical Interests | |
| Beans-Blue Lake | 2012 | Cornucopia | |
| Beans-Improved Tendergreen | 2012 | Cornucopia | |
| Beans-Trio | 2013 | Botanical Interests | Bush bean yellow, green, purple |
| Beet-Early Wonder Tall Top | 2012 | Cornucopia | |
| Beet-Ruby Queen | 2012 | Cornucopia | |
| Beet-Early Wonder | 2013 | Botanical Interests | |
| Beet-Gourmet Blend | 2013 | Botanical Interests | Variety of colors |
| Borage | 2013 | Botanical Interests | An edible flower that helps attact lots of bees |
| Buckwheat | 2013 | Botanical Interests | A type of green manure to grow and turn back into the soil |
| Carrot-Calliope Blend | 2013 | Botanical Interests | Multi Colored Carrots |
| Carrot-Little Finger | 2012 | Cornucopia | |
| Carrot-Tendersweet | 2012 | Cornucopia | |
| Chive | 2013 | Botanical Interests | |
| Cilantro | 2012 | Botanical Interests | |
| Cucumber-Lemon | 2013 | Botanical Interests | |
| Cucumber-Orient Express II | 2013 | Totally Tomatoes | |
| Dill | 2013 | Botanical Interests | |
| Eggplant-Hansel Hybrid | 2013 | Totally Tomatoes | |
| Kale-Italian Lacinato | 2013 | Botanical Interests | |
| Kohlrabi-Purple White | 2013 | Botanical Interests | |
| Leek-American Flag | 2013 | Botanical Interests | |
| Lettuce-Buttercrunch | 2012 | Cornucopia | |
| Lettuce-Mesclun Farmers Market Blend | 2013 | Botanical Interests | |
| Onion-Flat of Italy | 2013 | Botanical Interests | |
| Oregano | 2013 | Botanical Interests | |
| Parsley | 2012 | Botanical Interests | |
| Pea-Super Sugar Snap | 2013 | Botanical Interests | |
| Pepper-Big Chile | 2013 | Totally Tomatoes | |
| Pepper-Cayenne Purple | 2013 | Totally Tomatoes | A free packet that came with our order |
| Pepper-La Bomba Hybrid | 2013 | Totally Tomatoes | |
| Pepper-Rainbow Blend Bell | 2013 | Totally Tomatoes | |
| Radish-Cherry Belle | 2013 | Botanical Interests | |
| Radish-Easter Egg Blend | 2013 | Botanical Interests | |
| Rutabaga | 2013 | Botanical Interests | |
| Sage | 2013 | Botanical Interests | |
| Spinach-Correnta Hybrid | 2012 | Cornucopia | |
| Squash-Easypick Zucchini | 2013 | Totally Tomatoes | |
| Squash-Sunny Delight Scallop | 2013 | Totally Tomatoes | |
| Swiss Chard-Bright Lights | 2013 | Botanical Interests | |
| Swiss Chard-Fordhook | 2012 | Cornucopia | |
| Thyme | 2013 | Botanical Interests | |
| Tomato-Big Zac | 2013 | Totally Tomatoes | |
| Tomato-Brandywine Red/Yellow | 2012 | Botanical Interests | These did not produce well in 2012, but they were SO tasty. It's worth another go. |
| Tomato-Goliath | 2013 | Totally Tomatoes | |
| Tomato-Heirloom Cherry Blend | 2013 | Totally Tomatoes | A free packet that came with our order |
| Tomato-Supersweet 100 | 2012 | Botanical Interests | Bite size goodness in plentiful amounts. Perferct for the smalls to eat off the plant. |
| Turnip | 2013 | Botanical Interests |
Friday, January 25, 2013
Sowing the Seeds of Love
Forgive the painfully dated homage to the pop music of my youth... wow did I love that song.
It's mid-January and we have started seeds for several of our selections indoors, namely tomatoes, peppers, eggplants, and onions. Most pepper, tomato, and eggplants recommend starting indoors 8-10 weeks before the last probable frost which is mid April for us. We should have nice plants to transplant when it is time. There are a variety of ways to start seeds and we opted to get a grow lamp , a heat mat, and a thermostat to help get the little guys off to the best start possible. Other than the seeds and these items we tried to re-purpose items before they hit the trash or recycling bin.
Egg cartons made a great way to start onions. From what I've read, they can be a bit finicky to start from seed so I way over planted what we need. It may seem silly to have the white table cloth as we did, but it helped to track down wayward seeds that otherwise would be lost against the backdrop of the table.


Watering new seedlings requires a more delicate touch so the seeds do not get displaced. This water can was inspired by something I saw on Pinterest or the inter webs somewhere and it does a fine job. It's another water bottle with small holes drilled into the top. I leave it right next to the seeds and water as needed when I check on them throughout the day.

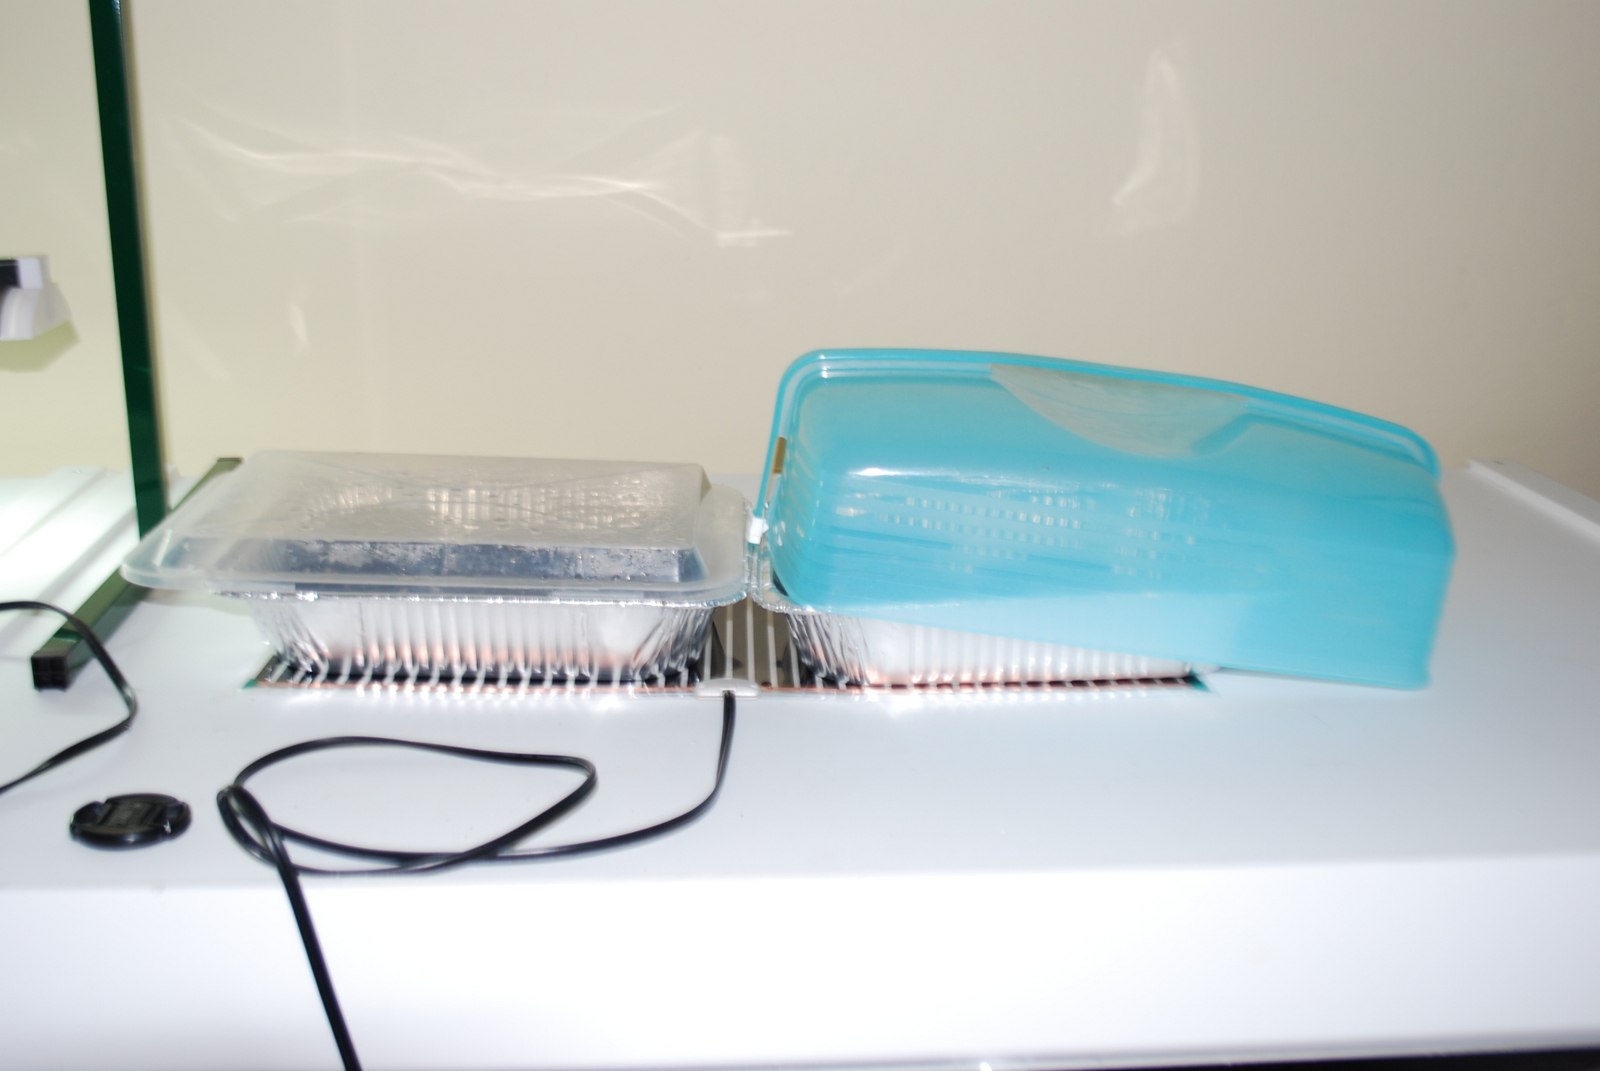
Until the seeds start to germinate, they don't require sunlight and can benefit from a cover to help keep the environment damp. I used cake and pan lids we have on hand.
With all these seeds it's was imperative to keep track of what is what. I pre-printed labels that we will use with seed information and days to harvest. Then on planting day we wrote the date and the number of seeds that we planted. This will help us gauge how readily our plant choices this year germinate. This one is a pepper, a variety called La Bomba from Totally Tomatoes. We planted 11 seeds on 1/24.


 We are well on our way to a sizable edible garden for this spring and summer and these little sprouts are a welcome reminder that spring is just around the corner. We have our seed nursery in our front room. While we could have put it in a less visible place, this ensures they get attention throughout the day and that we get to see things right as they sprout. The smalls get a big kick out seeing what grows each day and so far they have resisted the temptation to play in our indoor dirt.
It's mid-January and we have started seeds for several of our selections indoors, namely tomatoes, peppers, eggplants, and onions. Most pepper, tomato, and eggplants recommend starting indoors 8-10 weeks before the last probable frost which is mid April for us. We should have nice plants to transplant when it is time. There are a variety of ways to start seeds and we opted to get a grow lamp , a heat mat, and a thermostat to help get the little guys off to the best start possible. Other than the seeds and these items we tried to re-purpose items before they hit the trash or recycling bin.
Egg cartons made a great way to start onions. From what I've read, they can be a bit finicky to start from seed so I way over planted what we need. It may seem silly to have the white table cloth as we did, but it helped to track down wayward seeds that otherwise would be lost against the backdrop of the table.


For the tomatoes and peppers we used berry containers and cut off bottle bottoms from sparkling water. The berry containers had holes, but we had to punch holes in the water bottle bottoms for water drainage.


Watering new seedlings requires a more delicate touch so the seeds do not get displaced. This water can was inspired by something I saw on Pinterest or the inter webs somewhere and it does a fine job. It's another water bottle with small holes drilled into the top. I leave it right next to the seeds and water as needed when I check on them throughout the day.

Until the seeds start to germinate, they don't require sunlight and can benefit from a cover to help keep the environment damp. I used cake and pan lids we have on hand.
With all these seeds it's was imperative to keep track of what is what. I pre-printed labels that we will use with seed information and days to harvest. Then on planting day we wrote the date and the number of seeds that we planted. This will help us gauge how readily our plant choices this year germinate. This one is a pepper, a variety called La Bomba from Totally Tomatoes. We planted 11 seeds on 1/24.

Germination, it typically takes place withing 7-10 days of planting, but as I learned today, don't give up too soon. These seeds were planted two weeks ago and check out this little sprout that is popping up. Look closely on the bottom between the two established seedlings. He's there!

 We are well on our way to a sizable edible garden for this spring and summer and these little sprouts are a welcome reminder that spring is just around the corner. We have our seed nursery in our front room. While we could have put it in a less visible place, this ensures they get attention throughout the day and that we get to see things right as they sprout. The smalls get a big kick out seeing what grows each day and so far they have resisted the temptation to play in our indoor dirt.
Subscribe to:
Posts (Atom)